Monday, 8 July 2013

3 different people, 3 different windows - Assignment 2 (Part 3 of 5)

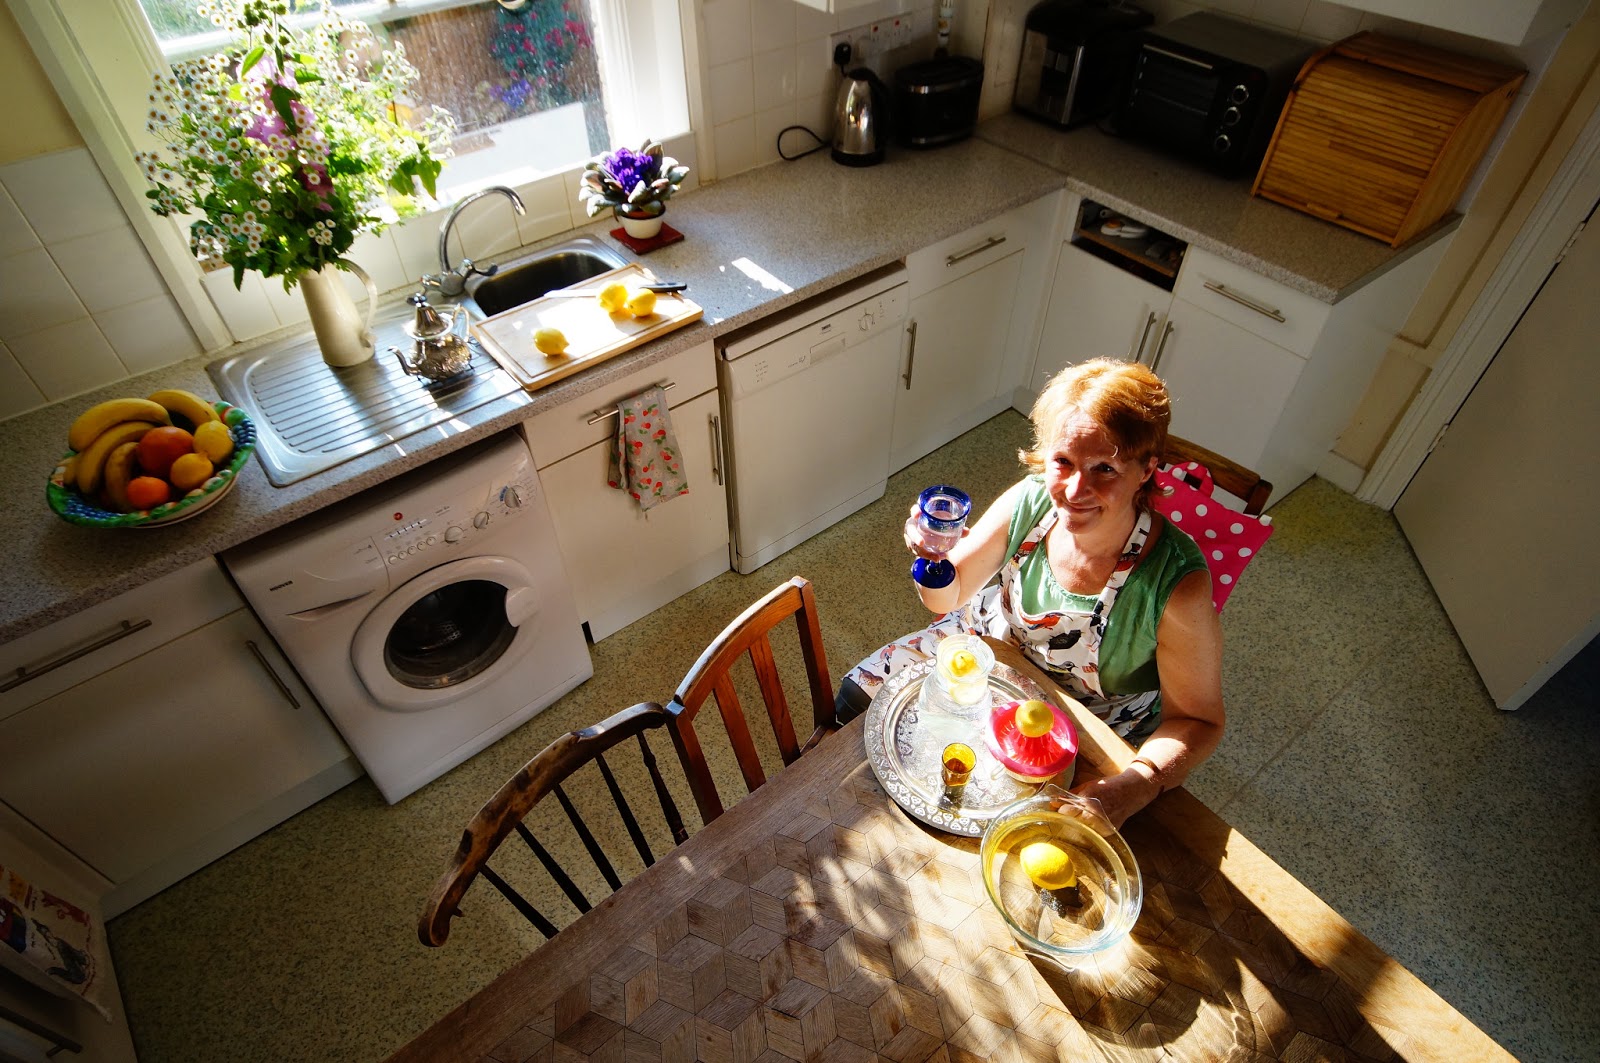
Photograph 7, Assignment 2
I wanted to meet the criteria of 'Indoor space in which the only avilable light is strong natural window light' for this set of high contrast images, while at the same time including different people. My reasoning for including a person for each scene was not only would it make the scenes more interesting but it would allow me to try to illustrate what each person was doing in each scene; in turn leading the eye around the scene. I planned to do this by using 'available objects' - an idea consisting of moving around objects that were already present in the scene in order to give information to the viewer regarding the scene/person.

   I found I had to work fairly quickly because in all three cases the Sun was either rising quickly (Photograph 7) or setting quickly (Photographs 8 and 9). It did however mean the Sun was streaming in throught the windows strongly, making the setting high contrast. I was still prepared to use live view, a tripod bracket my exposures and I'm glad I did because I chose the bracketed exposures carefully for each photograph when reviewing them afterwards.

Photograph 8, Assignment 2


   I tried to vary the composition for each of the three images. With Photograph 7, I chose a low viewpoint, an horizontal level in Photograph 8 and a viewpoint looking down in 9. This was mainly to keep each photo different but also so that the different compositions showed what was happening in the scenes better. In my opinion the strong available light and the placement of the 'available objects' worked well in combination. Placing the important objects in the sunlight helped draw the eye to them as they were more obvious.

    Because I was using liveview on my camera I could tell quite precisely how the photograph would turn out before I took each photograph for this set. With strong, available window light for me the scene as I saw it and how my camera rendered it were, kindly, very similar. If there was one difficulty it was balancing the highlights with the shadows/midtones. However, I was satisfied with the finally selected exposures after I had decided which bracketed exposure to use for each scene.

Photograph 9, Assignment 2
   One side note was the useage of my camera's 'Dynamic Range Optimiser' feature. Where previously I had deliberately turned off this feature (which gently lifts shadows, while attempting to keep noise at a minimum) - in the set 'High Contrast Street Photography' - here I used it at one of its low settings. This was so the (important, I felt) shadow areas could be lifted slightly while the highlights were simultaneously kept 'in check'. Without this turned on I thought the shadows would be too dark.

The Golden Hour - Low angle incident lighting - Assignment 2 (Part 2 of 5)


I was aware of the blue hour being desirable for night photography but until commencing upon actively looking for low angle incident light I hadn't really considered the hour before the Sun set. This 'golden hour' occurred anytime the Sun was clear of clouds and was obviously close to the horizon. I found it offered a good opportunity to create rich, warm photographs, because of the quality of light.

Photograph 4, Assignment 2


Photograph 5, Assignment 2


If there was one thing I discovered I didn't like about the 'golden hour' though, it was the necessity to work relatively fast and adaptably while taking the photographs as the light and the shadows it created didn't last long or stay consistent. However, I felt this was a worthy trade-off simply because of the light. Also it was a good challenge in terms of how I approached getting these straight-out-of-camera jpeg images.

Photgraph 6, Assignment 2
   As mentioned in the previous paragraph, I was aware of how seemingly quickly the light changed and how it reflected on the chosen settings. I attempted to capture the 'magic' found in my chosen scenes (which all included trees in the landscape) (Photographs 4, 5 and 6) how I saw it rather than letting my camera control the outcome of the photographs for me. To do this I set the camera on a tripod and used its live view on the LCD screen. This did mean it took longer for me to find the composition I felt worked best (as opposed to shooting handheld). It also meant however, I could quickly alter the brightness, white balance, aperture and focus of exposures (if required). The setting I found myself adjusting most was the brightness. I changed the brightness using the dedicated exposure compensation button on my camera; then turned the control dial until I reached the desired brightness on the LCD screen. I was looking for a setting that showed a little shadow detail, while simultaneously keeping the highlights not too blown out. The reason for wanting this kind of exposure setting was firstly to meet the assignment criteria of high contrast and also secondly to retain the magical feeling amongst the trees.

   I tried to further encapsulate of the 'magic' of the setting I had chosen for the third image (Photograph 6 for the assignment). Here, I used a person to add further interest to the setting where the person was 'catching' the last of the Sun. I placed the person and the Sun quite deliberately around the middle of the frame with all of the trees on either side framing them. This made for what I felt was both an aesthetically pleasing and suggestive photograph.

High-contrast Street Photography - Assignment 2 (Part 1 of 5)


Image 1
The lighting situation option 'Street scene in the middle of a clear, sunny day' I interpreted as a good excuse for street photography with a twist! The twist was of course the 'long, deep shadows' mentioned in the course in the description. This allowed me to be more creative than I sometimes had been doing street photography. I would put this down to having a themed criteria to channel my creativity into and also because I hadn't really had much experience with high contrast street scenes.

   I chose Covent Garden as the location for the first of my three versions of this lighting situation, simply because I reckoned it would have some potential for high contrast shadows.

Photograph 1, Assignment 2


With the first of the three photographs (Photograph 1, Assignment 2), I utilised an interesting idea I had thought up based on high contrast situations. It was along the lines of: while DSLR's are often desirable for their ample amounts of dynamic range, I have discovered that lesser dynamic range can still be desirable on the same cameras. Instead of harnessing the dynamic range inherent in DSLR's, it is sometimes effective to limit dynamic range within certain lighting situations. This can create a minimalistic effect that is powerful. It is the DSLR's ability to control the metering and to some extent the dynamic range of a photograph that make them useful in high contrast circumstances. The way dynamic range can be controlled to some extent in camera is a feature found on most DSLR's nowadays, in my camera's case: 'Dynamic Range Optimiser'. This setting effectively 'opens up' shadows subtly without much penalty for noise when turned on. So, deliberately turning it off - enhances the highlights' contrast with the natural, black backdrop when exposed for bright highlights.

   For example this minimalistic effect can be seen in a photograph (Image 1) I took of a yellow Welsh Poppy set against a natural black backdrop. I exposed for the highlights (the poppy), which was so bright the shaded background became solid black.

   I tried to employ the techniques described above to a street scene and I thought I was successful. I deliberately turned off the 'Dynamic Range Opimiser' and exposed for the bright highlights I'd found set against an already dark passageway in Covent Garden, which turned the passageway black. This created a dramatic effect - isolating the two people chatting. This created an interesting dialogue in my opinion - not only between the two women chatting but also their relationship with the intense black behind them. The latter 'dialogue' suggested instead of the two of them talking in a relaxed manner, that something slightly ominous was happening - backed up by the expression on the woman-on-the-right's face.

Photograph 2, Assignment 2
   I decided to try a variation on this theme of exposing for the bright highlights in the second of the three photographs (Photograph 2, Assignment 2). Here, I deliberately used the dark, shaded sides of a narrow alleyway on either side of a brightly lit area to effectively frame a subject present in the bright, sunlit area in the middle of the alleyway. I thought this dark, virtual frame provided by the sides of the alleyway led the eye well into the sunny highlights in the middle distance.  

   For the third image (Photograph 3, Assignment 2) I returned to a similar usage of the high contrast situation as in the first two images, where the background was very dark but the highlighted people were exposed correctly in front of the dark background. Here however, there was an emphasis on the people 'emerging' from the darkness rather than being set against it. This was helped I felt by the diagonal lines the shadows had cast from the high buildings in the narrow street. They helped to lead the eye around the frame, in particular towards the main subjects; the three women chatting while walking.

   I was careful, however with this third image to try to get the exposure how I wanted as of course no post-processing and only jpegs were allowed for the assignment. For me this meant leaving some shadow detail present in the floor and sides of the alleyway, while retaining all of the highlights (which were very bright because of the sunny weather). To do this I put the camera in manual mode and fixed the aperture, while adjusting the shutter speed until I had the exposure I required. This worked well, for a couple of reasons. Firstly, the camera I was using was a Sony DSLT, which possessed an electronic viewfinder. While this type of viewfinder has its drawbacks, one of the advantages is the ability to quite accurately preview the result of your exposure before taking the shot through the viewfinder. So I just adjusted the shutter speed until the highlights were correctly exposed, while there was simultaneously quite minimal shadow detail.

Photograph 3, Assignment 2
   Secondly, and more obscurely, it meant I could preview the result of the exposure to check the people in the bright parts of the image without having to reset the exposure (which would have been by using the exposure lock toggle) each time. This was because with manual mode the exposure is already 'locked' in whatever exposure parameters you have set it in.

   As a side note, I found that with this type of high contrast street photography, there wasn't much time to check histograms (be it within the viewfinder or LCD screen) as you shot. This was because of the quick nature of taking the photos, where the subjects were mostly moving. Instead I found myself relying on the electronic viewfinder of my camera to give me an approximation of how the resultant image would turn out.

What I've Gathered About the Zone System and How I Might Implement It for the Second Assignment

My initial impressions when I came across the Zone System was that it was a considered approach to predominantly landscape photography. I discovered the Zone System (invented by Ansel Adams) was of course initially designed for use with black and white film but 'lost most of its purpose when color took over from black and white' - M. Freeman (2011). With the advent of digital photography however, the Zone System made a resurgence as it 'has some valuable lessons to teach in the new context [digital photography]' - M. Freeman (2011).

   Although I realised the Zone System was most effective for landscape, digital photographers, when shooting in the RAW format I was confident it would come in useful for a couple of the types of sets of high contrast scenes I had planned to photograph. Shooting in the RAW format - something I wasn't allowed to utilise for the second assignment - worked better than jpeg because 'you have the time to reconsider the image later and alter the tonal relationships' - M. Freeman (2011).

   However, I was confident because, with these particular scenes I would have time to consider which elements of the scene fell into which zone and how important each defined zone of the scene was to me. This time to consider came from the lighting remaining consistent for a good period of time. Also, to a certain extent, I would be able to 'reconsider the image later' - M.Freeman (2011) because I planned to bracket the exposures of the jpegs for these scenes.

   The consistently lighted scene I planned to capture while employing the Zone System and bracketing exposures was: 'Scenes which include objects of very different reflectivity'. Regarding the Zone System I planned to draw a sketch of the scenes then and there and set the exposure accordingly or at least make a sketch afterwards and decide which bracketed exposure taken before at the scene best met my preference after I had reconsidered the versions of the scene on the computer.

Thursday, 4 July 2013

My Thoughts Leading Up to the Second Assignment for DPP

My immediate reaction when reading about the second assignment for Digital Photographic Practice was that it would be a challenge. What I started to realise as I prepared for it and take part in it was how rewarding a challenge it was turning out to be. Rewarding because it made me look at lighting in particular in a very different way.

   Previously I had been aware that lighting was key in photography and the basis for all photography but I hadn't looked specifically for this trait in a photograph I was planning to take. Instead I was mostly looking for composition and indeed interesting subject matter qualities. While these are of course important aspects of most photographs, I found personally that by starting this assignment I was learning a lot more about technical aesthetics of a photograph than before. So I saw the key ingredient for Assignment 2 as being variety, with the main variable being lighting.

   The fact that the type of lighting I had been asked to find or replicate was strictly high-contrast made the assignment much more useful and provocative than perhaps low-contrast lighting would have for me. I thought it was important to be aware that, even though all the scenes were high contrast, they modelled the subject differently because of the way the light fell or was set to fall on it.

   I have been reading a couple of books, which cover in some detail, the various lighting situations you can encounter and how to go about photographing them. One, 'The Digital SLR Handbook' states it is 'better to 'Sacrifice detail in the less important areas of your image' - M. Freeman (2011). Well, I thought this would be beneficial to me because the most challenging part of the assignment for me was the forbidding of post-processing, where all photographs had to be straight-out-of-the camera jpegs. Hopefully, I would be able to incorporate what I had learnt so far from these books into the assignment.

   Through another book, I had been becoming much more familiarised with histograms. In particular I was interested in how histograms could quickly show which parts of the soon to be taken/resultant image were predominantly gathered in terms of brightness. In fact, the book 'Mastering Digital Photography' stated 'you can interpret it [the histogram] at a glance' and how 'a histogram is, in a way, a map of the image' - M.Freeman (2008). I was quite optimistic about using the histogram while shooting as my camera possessed a histogram within the (electronic) viewfinder. This potentially meant I could be sure of not clipping highlights for example, while still shooting with the camera to my eye. For the assignment I decided I would turn the histogram on for both the viewfinder and the LCD screen.

My camera's white balance


1. Auto white balance in open shade
2. Daylight white balance in open shade
3. Shade white balance in open shade
4. Cloudy white balance in open shade


I shot in the jpeg image format so that the same processing and white balance options for each setting remained consistent for the varying required lighting situations. This included using auto white balance, daylight, shade and cloudy settings for lighting situations including daylight, open shade on a sunny day and cloudy.
5. Auto white balance in sunlight

7. Shade white balance in sunlight
6. Daylight white balance in sunlight
   My impressions were that three of the four camera settings produced 'okay' results in all the required lighting situations. These camera settings were auto white balance, daylight and cloudy. I found the opposite to be true for the shade camera white balance setting. Here, unsurprisingly, this setting worked 'okay' in the open shade lighting situation (Image 3) but looked way too warm in the other two lighting situations. Even in the 'open shade on a sunny day' lighting situation (Image 3), although the face of the subject looked quite natural, the rest of the image was still too warm for my liking.
9. Auto white balance in cloudy weather
8. Cloudy white balance in sunlight

   To go into further detail concerning the other white balance settings, auto white balance produced quite accurate results. For example, with the daylight lighting situation, there was not much discernible difference between this auto white balance setting (Image 5) and the dedicated 'daylight' white balance setting (Image 6) on my camera. The same was true for cloudy weather.
10. Daylight white balance in cloudy weather

11. Shade white balance in cloudy weather
12. Cloudy white balance in cloudy weather
   With the daylight and cloudy presets however there were some differences in colour cast, although not as severe as with 'shade'. These differences were that the cloudy preset produced slightly warmer results in all lighting situations compared to daylight, something that was backed up by the accurate auto white balance renditions in daylight and cloudy weather. So, in daylight the auto white balance and daylight presets were very similar, as were the auto white balance and cloudy presets in cloudy weather.

Monday, 10 June 2013

A Variety of Scenes with Differing Dynamic Range

I have been familiarising myself with assessing scenes of differing dynamic range so that I could make informed judgements on how 'best' to capture setting ranging from low contrast to high contrast. I saw completing this project in my course as a means of being able to effectively recognise the different effects various lighting had on a scene and henceforth the camera's ability to record it.

Photograph 1
   I quickly came to realise that for me, it was a lot easier to find high contrast scenes than low contrast ones - when you were out looking for either. I could put this down to sunny weather only but I also felt I started to notice the effect highly reflective surfaces or light sources had on a scene, which in turn challenged my camera's dynamic range.

Photograph 2
   So it's not much of a surprise three of the five resultant images were of medium to high contrast. These three were offset by a required low contrast scene (Photograph 2) and one where I had deliberately searched for a setting where the levels of light were spread across quite evenly through (and within) the histogram (Photograph 5). I included this because I thought it would be a good example showing the range of light my camera could record.

   Speaking of recording, I also measured and recorded the lightest and darkest areas of each of the five scenes. I found some interesting results but as I had thought beforehand the main factor was the light. Overcast days obviously had lower contrast but with sunny days the contrast varied from medium to high. I found there to be at least one bright patch and one darker area within most scenes on a sunny day. Also more often than not I found there to be some object reflecting light on these sunny days.

Photograph 3
   I measured the lightest and darkest areas in the same way as in the previous exercise: using spot metering and zooming in to the lightest and darkest areas. Here are my results:

Photograph 1: The camera settings for this scene were f/7.1, 1/125 and ISO 800, with an exposure bias of +0.7.
The darkest area (the bottom of the shop fronts) was metered at f/7.1, 1/20 and ISO 800 with an exposure bias of +0.7.
The lightest area (the roof windows) was metered at f/7.1, 1/2500 and ISO 800 with an exposure bias of +0.7.
This meant the scene had a dynamic range of 7 stops of light.

Photograph 2: The camera settings for this scene were f/8, 1/40 and ISO 200 with an exposure bias of 0.
The darkest area (the plants in shadow in the bottom right of the frame) was metered at f/8, 1/25 and ISO 200 with an exposure bias of 0.
The lightest area (the light leave in the distance) was metered at f8/, 1/80 and ISO 200 with an exposure bias of 0.
This meant the scene had a dynamic range of approximately only 1 and 2/3rds stops of light.

Photograph 3: The camera settings for this scene were f/5.6, 1/125 and ISO 400 with an exposure bias of 0.
Photograph 4
The darkest area (the shadows in between the columns) was metered at f/5.6, 1/25 and ISO 400 with an exposure bias of 0.
The lightest area (the sky) was metered at f/5.6, 1/1000 and ISO 400 with an exposure bias of 0.
This meant the scene had a dynamic range of approximately 5 and 1/3 stops of light.

Photograph 4: The camera settings for this scene were f/10, 1/80 and ISO 100 with an exposure bias of +1.
The darkest area (the door into the left building) was metered at f/10, 1/5 and ISO 100 with an exposure bias of +1.
The lightest area (the Sun's reflection in the glass of the left building) was metered at f/10, 1/800 and ISO 100 with an exposure bias of +1.
This meant the scene had a dynamic range of approximately 7 and 1/3 stops of light.

Photograph 5: The camera settings for this scene were f/5.6, 1/125 and ISO 200 with an exposure bias of -0.3.
The darkest area (the car tyres) was metered at f/5.6, 1/25 and ISO 200 with an exposure bias of -0.3.
The lightest area (the sun-lit tops of the buildings in the distance) was metered at f/5.6, 1/2000 and ISO 200 with an exposure bias of -0.3.
This meant the scene had a dynamic range of approximately 5 and 1/3 stops of light.

   As can be seen in the processed images, all of the images 'fitted' within my camera's dynamic range of 8 stops. While this was pretty easy for Photograph 2, it was a bit of a stretch for my camera to cope with Photograph 4 especially. My impressions I got from this project was there were a lot of high contrast situations to encounter, especially in sunny settings and judging how to capture these situations 'best' was important then and there - even if you intended to post-process them afterwards.
Photograph 5